Pocket notebook cover
Ill start off with the pocket notebook sized leather cover I made.
To start off with, youll first need some leather. Before recommendations, I want to explain leather real quick just in case youre totally ignorant of it just like I was. The most common leather types youll find are veg tanned and chrome tanned leather. Leather starts out as this raw hide type thing, like dog bones, but you can either use vegetable material or chromium salts to make it act like you would normally think of leather.
Chrome tanned leather is softer and acts much more like what you would think of leather as, like a jacket or a purse. But it wont get darker with time, like real leather will. Veg tanned leather starts off this light tan and will patina with time and is much more natural, chrome tanned leather will actually rust stuff while veg tanned leather wont. So if you want a natural cover that will age with time, get veg tanned. If you want leather that’ll start out looking how you want it to in the end, you can use chrome tanned. Veg tanned leather usually is thicker too, so chrome tanned may fold easier.
So, you can get your leather from a few places. Honestly, I got mine from hobby lobby. For a small project like this they’ll have what you need. You can start off with a remnant pack that’s like $6. Its small pieces from other projects that’s resold, if you look at a few packs youll probably find one with pieces big enough for your. Thesell be chrome tan and thin, so youll make a nice thin cover that folds easily with this. Or you can get a “trim piece”, which is about the size of a piece of printer paper. These usually have some neat patterns and finishes, like getting lighter at places where it bends a lot. A rule of thumb is if it doesn’t say veg tanned or tooling leather, its not veg tanned.
You can get a printer paper sized piece of tooling leather at hobby lobby for the same price as the “trim pieces”, these are about $11. You can get some veg tanned leather around the same size and price at Tandy leather. They are a much higher step up in leather than hobby lobby and have a larger selection of higher quality tools and materials. You want a piece that’s not too thin or thick, it should bend and fold like a really thick piece of fabric or canvas. If you fold it over and it takes some elbow grease and the leather springs flat again, its probably too thick.
Next youll need something to stitch the leather together. Youll need waxed thread so the thread doesn’t fray easily and holds up well. Hobby lobby has waxed thread in rolls and bundles for like $2-3. There are variety packs of different colors for like 6$, and the $2-3 packs are usually only black or brown. The smallest packs will be more than enough for one notebook.
Youll also need stitching needles, they are bigger and more blunt than sewing needles so be sure to get the right one. Youll need at least 2 and a pack of 10 at hobby lobby is like $1.50.
The last thing is something to make holes in the leather for stitching with. To be honest, the first time around I just used a nail. But it really sucked and made a crappy finished product, so I recommend a diamond stitching chisel. They’re like $4.50 at hobby lobby. It looks like a 4 pronged fork, but it’ll make these nice rhombus shaped holes that’ll give youre stitching a really nice look. You can buy an awl or something too, but thatll require making holes one by one, I think its worth the few dollars to save time. Its much easier to get your stitching holes straight too. Youll also need something to hammer the chisel with, a metal hammer works but will make the end of your chisel all messed up, so a rubber mallet works better. But Ive used a metal hammer, and it hasn’t ruined my chisel too much so if you don’t care then whatever.
Then of course the notebook itself, I got a 3 count of mini composition notebooks at Walmart, these measure 3.25 in x 4.5 in. Any smaller and thinner than these notebooks will work fine, but I cant make any garuntees for anything thicker or bigger. You could fit 2 of these mini notebooks in this cover for more organization or pages, but anything more than that then yeah.
That’s all you really need, but heres some stuff I recommend.
To cut the leather, the best thing to use is probably a rotary cutter. Ive seen them at dollar tree but theyre common enough you could get it at hobby lobby or Walmart. You can use a utility knife too. A ruler to make straight cuts with is actually pretty much necessary. Leather is tough to cut so a straight edge helps a lot to make a cut. A cork bottom ruler helps the ruler not slip when your making cuts if you want that, I make do with a regular ruler and pushing down really hard just fine. Some rubber cement, multi-purpose cement, or super glue to glue the edges of the pieces of leather together before stitching is useful too.
I think that’s pretty much it.
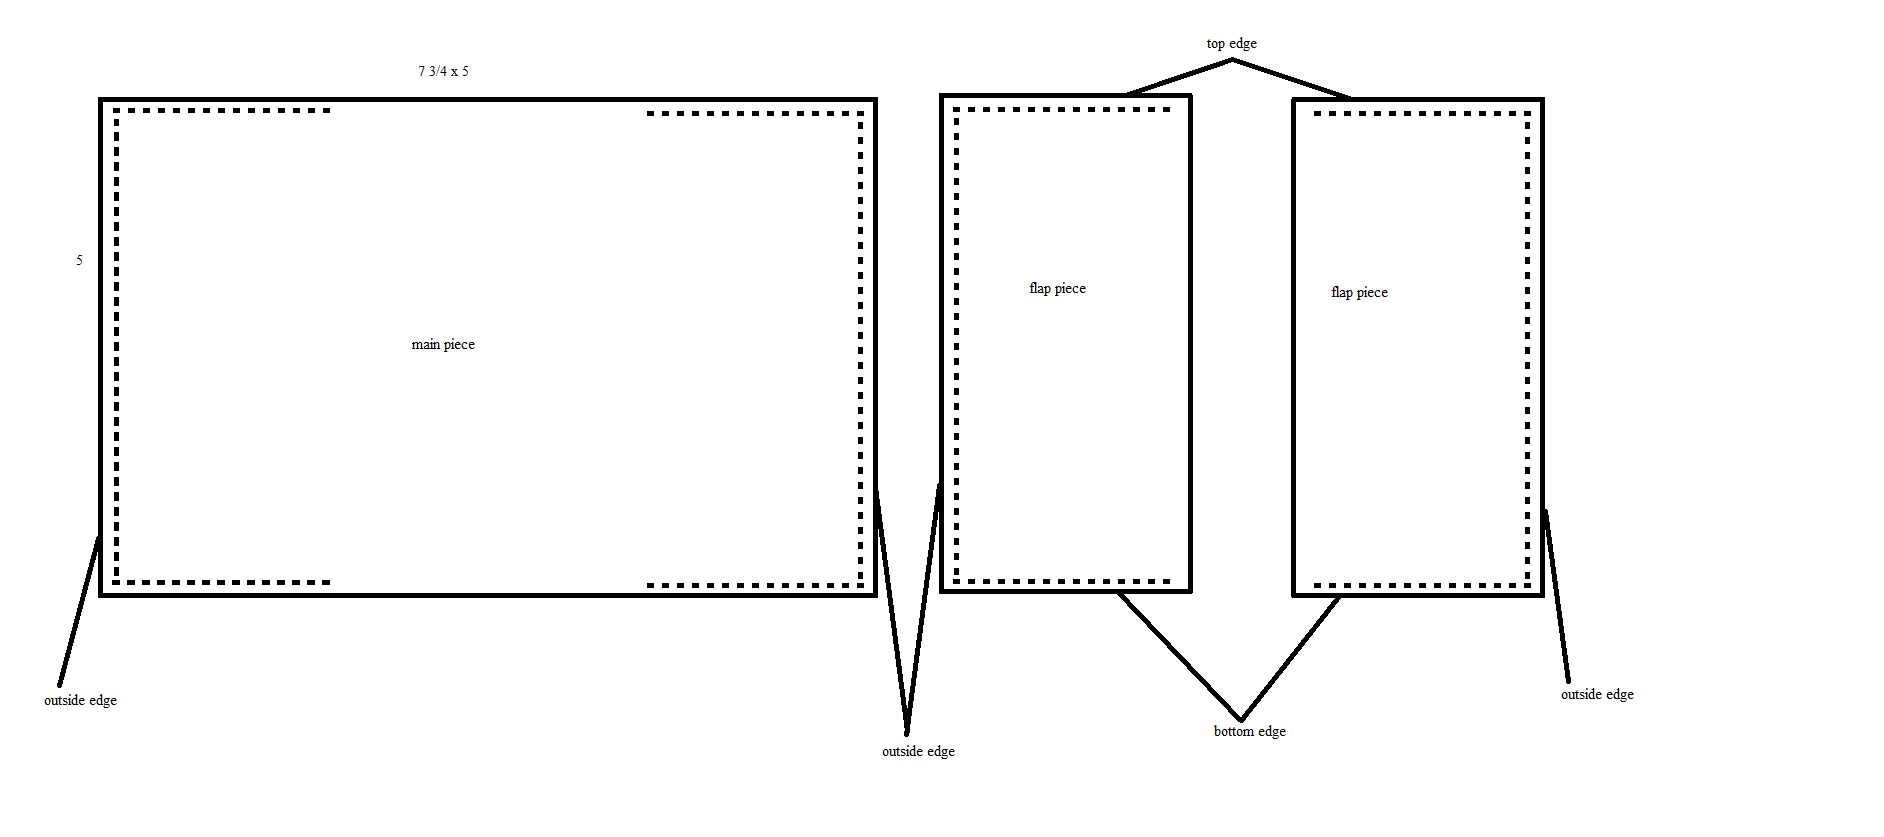
So, to start out, I recommend marking out 7 ¾” x 5” rectangle on your leather. As you mark out al these pieces, I recommending using the end of the ruler to square off the corners of the rectangles. Making everything perfect square is tough for me so I used the ruler corner to mark out the rectangle corners. You can do this on either side, the nice flat side (skin side) or rough/fuzzy side (suede side). This will be the main notebook cover piece. Next youll want to mark out 2 rectangles that each measure 2”x 5” in addition to the larger piece. These will be the flaps our notebook slide into to be held by the cover. 2”x 5” is the exact measurement, but I sort of recommend doing 2” x 5 ¼”, so that the flaps will be a little taller than the main piece. With a little bit of leather poking out of either end of the main piece, you could cut these off flush to the main piece at the end so the edges are perfectly flush together.
Next youll want to cut these pieces out. I recommend using the rulers straight edge to make the cut, and going a little past the corners. Youll have to push down hard so make sure to have a scrap piece of plywood or some type of cutting mat under your leather.
Once you cut these pieces out, youll want to mark out your stitch line. I made a line 4mm from the edge on all my pieces. You can do 5/32” or 1/8”, but 4mm works good for me, sometimes 1/8” is too small but I think I measure wrong. To make this line you can just mark out dots 4mm from the edge a handful of times, line your ruler edge up with these dots, then make the line by going through the dots. There should be 4 lines on each side of all 3 pieces 4mm from the edge, like an inner perimeter.
This next part I haven’t really perfected. You can either make the holes while all the pieces are separate, or glue the pieces together then make the holes. Making the holes when the pieces are separate make it easier to create the holes, but requires some planning. Glueing the pieces together then making the holes is much easier and more straightforward, but removing the chisel from the holes you made can be tough and wrinkle the leather a bit when youre removing the leather from the chisel.
FOR MAKING HOLES WITH THE PIECES SEPARATE: When choosing this method, if you make holes on the skin side of the main piece of leather, youll have to make the holes on the suede side of the flap pieces of leather. If you make the holes on the skin side on the main AND flap pieces, when you put the suede sides together for stitching then the holes will be mirrored and wont line up. This is how the diamond chisel is, if you use a round punch then that’s different. But Ive never used those so I cant say much about them. In the end, if you make the holes through the skin side of the main pieces, you must make holes through the suede side of the flap pieces. Or vice versa. Start making your stitching holes with your chisel starting from a corner of the stitching line. If you have a 4 prong chisel, once you make the first 4 holes, put the 1st prong of the chisel in the last hole you made just before, the line up the rest of the prongs with the stitch line. This will keep your stitches straight. If you want to be 100% sure, out the 1st and 2nd prong in the last 2 holes you just made. Do this until to get to the edge or other corner of your stitch line. Go back to the corner you made, and put your 1st prong of your chisel in the 1st hole you ever made, it should be in the point of the corner you started in. Then repeat for that edge. Continue for the bottom, top, and outside edge of the flap and 1 side of the main piece.
FOR MAKING HOLES WITH THE PIECES GLUED TOGETHER: If you made the flaps 2” x 5”, put glue on the suede side edges of all pieces. Then, with the suede side of one flap leather piece facing the suede side of the main leather piece, line up the corners and sides of the main and flap pieces and press the leather pieces together. The edges of each piece should be flush against each other. If you made your flaps 2” x 5 ¼” , then line glue the top, bottom, and side edges then line up just the side edges. Then start making your stitching holes with your chisel starting from a corner of the stitching line. If you have a 4 prong chisel, once you make the first 4 holes, put the 1st prong of the chisel in the last hole you made just before, the line up the rest of the prongs with the stitch line. This will keep your stitches straight. If you want to be 100% sure, out the 1st and 2nd prong in the last 2 holes you just made. Do this until to get to the edge or other corner of your stitch line. Go back to the corner you made, and put your 1st prong of your chisel in the 1st hole you ever made, it should be in the point of the corner you started in. Then repeat for that edge. Continue for the bottom, top, and outside edge of the flap and 1 side of the main piece.
Now for stitching. For the actual stitching, Ill just recommend this video cause I think it’s the best way to learn. Youll start on the either the top or bottom inside edge, where the stitch holes begin. I personally started at the top and ended at the bottom. This will take a while, but its easy to get the hang of the technique for stitching, once you do you can just watch a movie or youtube video until you finish. For whatever reason I sometimes only get angled stiches on one side. So if this happens to you, heres a fix. Itll be really hard to explain through text so hopefully it makes sense. If youre only getting angled stitches on one side and straight stitches on the other, im going to call the side with the angled stitches the “outside face”, and the one with the straight stitches the “inside face”. In the video, at the end of completing a stitch you pull on either needle to snug the loops up to the stitch. On each face, before pulling the needles, there is a needle with thread and a loop with thread. On the INSIDE FACE, pull the needle through the bottom of the loop. So if the loop is facing out horizontally, the needle goes through the inside of the loop from the bottom. Then, pull the needles to snug up the loops and finish the stitch. If you had the same problem, hopefully that helped.
Once youre done stitching, your cover should be done! Just slip your notebook cover into the flaps and there you go. Ill sometimes put gift cards in those flaps, ive heard people use binder clips clipped onto the side of a cover to clip their pens onto. You can do whatever you want with this thing, its yours now.
I numbered every even page in my notebook and added an index to quickly find quotes and important stuff. Ive filled 80 pages since winter started (I think) which is a lot quicker than my old notebook. At first I felt bad about putting my ideas in a notebook since I felt like they weren’t worth much. But you really gotta yolo it and just write everything in there, arguments, opinions, reminders, questions, jokes, ect. Its kinda just a neat way to get off your phone. If you got any questions please contact me or whatever. Sorry for not posting in a while, some stuff has been going on but nothing that’s really a good excuse. Ill try and get the tutorial for the full size notebooks out soon, so see yall then.